As an Amazon Affiliate, I earn from qualifying purchases.


Comply with this step-by-step tutorial to discover ways to can dried beans. Having shelf-stable canned beans available means your favourite soups, casseroles, and facet dishes might be prepared in a flash.

Hear individuals – home-canned beans are so a lot better than what you will discover in grocery shops! They style higher and they’re additionally one of many best recipes to pop right into a strain canner to inventory your pantry.
That is the right canning challenge to be taught to make use of your strain canner. Don’t be intimidated. You are able to do this, and I’ll assist.
At midnight of winter whenever you’re simply exhausted and may’t be bothered to prepare dinner dinner, a jar of canned beans can be utilized to make turkey rice casserole or our Immediate Pot white hen chili. Take into account this present you, being sort to future you.
Can You Can Dried BEans With out a Strain canner?
Sadly, no.
And, I’ve to bolster this level: you can not safely can dried beans in a water tub canner. They should be preserved utilizing a strain canner.
No strain canner? You’ll be able to freeze beans! Permit the cooked beans to completely cool and retailer in freezer-safe containers. After which go stay your greatest life.
Easy methods to can dried beans
*I’ll stroll you thru it right here with images, and an in depth and printable recipe card is obtainable on the backside of this put up.
This recipe will stroll you thru the method of cooking after which canning dried beans. Finest practices name for under canning already cooked beans. You’ll be able to’t merely add dried beans to the jar, add water, after which can them.
You’ll be able to prepare dinner your beans utilizing whichever technique you favor—stovetop, sluggish cooker, or Immediate Pot. For those who’re new to cooking beans from scratch, my pal Katie has about eleventy-billion posts on how you can prepare dinner dried beans.
Whether or not or not you soak the beans earlier than cooking is as much as you and the tactic you favor. You do not want to discard the cooking liquid wherein you cooked the beans.
Wash and clear your jars. It’s now not essential to sterilize jars earlier than canning (hurray!) however you must be certain they’re preheated sufficient to not crack when positioned in scorching water.
You’ll be able to put them in a clear dishwasher and run them by a fast wash cycle, or place them in a big pan with some water in a low warmth oven (my lowest temp is 170˚F) till you want them. I’ve even simply put scorching faucet water in them earlier than and left them on the counter.
Wash your lids with scorching soapy water and place them in a clear bowl for now.
Add 3 quarts of water to your strain canner and put it on a burner set to excessive. Be certain that there’s a canning rack within the backside of the canner.
Utilizing a slotted spoon and a canning funnel, add the beans to jars after which fastidiously ladle within the cooking liquid, leaving 1-inch of headspace.
Utilizing an extended utensil (I want a plastic chopstick), take away all of the air bubbles from the jar. Clear the rim of the jar very effectively with a scorching damp rag. Any meals particles left on the rim could influence the seal of the lid within the canner.
Place a clear and new lid on the jar. Add a hoop, and tighten to fingertip tight.


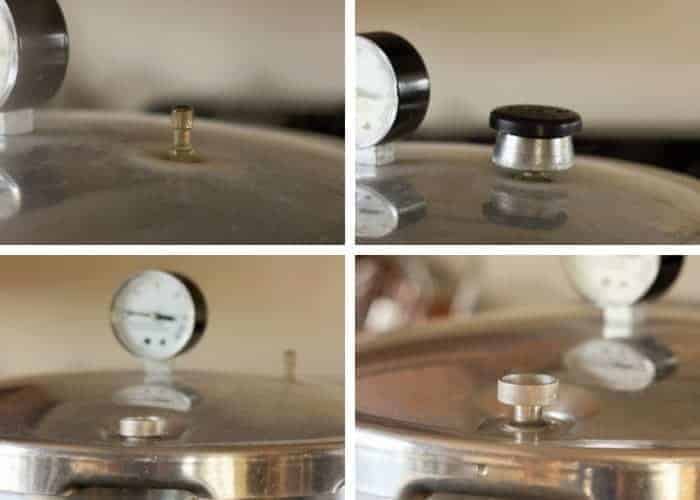
Utilizing canning tongs, gently place the jars within the canner. Lock the lid. Quickly, steam will begin coming by the vent pipe (I name it the steam chimney). Permit the steam to cross by for about 10 minutes. Then put the strain regulator (I name it the chimney cap) on prime.
Fairly quickly, the air vent will pop up. That may be a signal that you just’re beginning to construct strain contained in the canner (get excited. That is taking place!).
Processing instances will fluctuate primarily based on altitude. See the charts under.
Strain Canning Dried Beans in a Dial-Gauge Strain Canner
| Canner Strain (PSI) at Altitudes of | ||||||
| Type of Pack | Jar Measurement | Processing Time | 0-2,000 ft | 2,001-4,000 ft | 4,001-6,000 ft | 6,001-8,000 ft |
| Sizzling | Pints | 75 min | 11 lbs | 12 lbs | 13 lbs | 14 lbs |
| Quarts | 90 min | 11 lbs | 12 lbs | 13 lbs | 14 lbs | |
| *Supply: Nationwide Heart For Residence Meals Preservation | ||||||
Processing Time for Dried Beans in a Weighted-Gauge Strain Canner
When the dial gauge reaches 11 kilos of strain, scale back the burner temp to medium, and begin your timer. The strain should keep at 11 or (a bit bit) above at some point of the cooking time. You’ll doubtless want to regulate the temp on the burner a couple of instances relying in your range.
When the time is up, take away the canner from the burner and permit it to take a seat till you hear a particular “click on” of the air vent dropping. Take away the strain regulator and thoroughly take away the lid (Professional tip: I all the time use oven mitts after I take the lid off as a result of the steam is tremendous scorching).
Let the jars sit for five minutes within the canner after which fastidiously elevate them out with canning tongs. Professional tip: permitting the jars to take a seat within the canner with the lid off may also help scale back the siphoning of liquid in your jars. Siphoning is when liquid seeps out from beneath the lids and reduces the general quantity of liquid within the jar.

Place scorching jars on a towel the place they will sit undisturbed for 12 hours.
After a couple of hours, to test for sealing, gently press down in the course of the lid. If the lid has no give, it’s sealed. For those who can press the lid in and it pops a bit, your jars are usually not sealed.
What if my jars don’t seal?
For those who’ve accurately processed the beans, and the lids nonetheless didn’t seal, you’ll be able to reprocess them.
Double-check to ensure there aren’t any:
- Chips within the rim of the jar
- Dried bits of beans on the rim (something between the rim and the lid could forestall a seal.
Finest practices would contain utilizing brand-new lids for reprocessing. Put aside the previous lids to make use of for dry storage (associated: Pantry Necessities for the Residence Prepare dinner).
If the jars don’t seal on the second try, you doubtless have a nasty batch of lids, or your canning course of has a step lacking. E mail me and we’ll attempt to troubleshoot what’s going on.
How lengthy do canned dried beans final?
As soon as the jars have sealed, take away the rings. Label and retailer sealed jars in a cool (greatest outcomes are 50-70˚F) darkish place for as much as 12-18 months.
If in case you have the area accessible, don’t stack the jars on prime of one another greater than two jars excessive.
For those who open a jar to be used and don’t use all of it, you’ll be able to retailer it within the fridge for as much as three days.
Professional ideas/recipe notes
- The processing instances within the canner are the identical it doesn’t matter what number of bean you might be canning.
- You’ll be able to add salt to every jar previous to canning it. Use desk salt and add 1/2 tsp of salt per pint or 1 tsp per quart. Personally, I discover the unsalted model simpler to make use of in recipes as a result of it permits me to manage the general sodium.
- Strain canners can usually go away white traces on lids and rings. It’s completely regular and secure. To forestall this, add 1/3 cup of white vinegar to the canner earlier than processing.
- For those who don’t have sufficient jars to fill the canner, contemplate Canning Water in a couple of jars to inventory your emergency consuming water provides.

Stop your display screen from going darkish
-
Prepare dinner beans utilizing whichever technique you favor—stovetop, sluggish cooker, or Immediate Pot. Whether or not or not you soak the beans earlier than cooking is as much as you and the tactic you favor. Soaking shouldn’t be required.
18 cups COOKED beans
-
You do not want to discard the cooking liquid wherein you cooked the beans. Hold for filling the jars.
-
Wash and clear your jars. Fill with scorching water or hold them heat in a clear dishwasher or oven.
-
Wash your lids with scorching soapy water and place them in a clear bowl.
-
Add 3 quarts of water to your strain canner and put it on a burner set to excessive. Be certain that there’s a canning rack within the backside of the canner.
-
Utilizing a slotted spoon and a canning funnel, add the beans to jars after which fastidiously ladle within the cooking liquid, leaving 1-inch of headspace.
-
{elective}: add 1 tsp of salt per quart or 1/2 tsp salt per pint.
9 tsp desk salt
-
Use an extended utensil (I want a plastic chopstick), to take away all of the air bubbles from the jar.
-
Clear the rim of the jar very effectively with a scorching damp rag.
-
Place a brand new and clear lid on the jar. Add a hoop, and tighten to fingertip tight.
-
Utilizing canning tongs, gently place the jars within the canner.
-
Lock the lid. Quickly, steam will begin coming by the vent pipe.
-
Permit the steam to cross by for about 10 minutes. Then put the strain regulator on prime.
-
Fairly quickly, the air vent will pop up.
-
In a dial-gauge strain canner, course of pints and quarts primarily based on the elevation information under (see processing chart in put up for added altitude changes):*0-2,000k ft {PSI: 11 lbs of strain} = Pints 75 min, Quarts 90 min*2,001-4,000k ft {PSI: 12 lbs of strain} = Pints 75 min, Quarts 90 min*4,001-6,000k ft {PSI 13 lbs of strain} = Pints 75 min, Quarts 90 min*6,001-8,000k {PSI 14 lbs of strain} = Pints 75 min, Quarts 90 min
-
When the dial gauge reaches the suitable PSI, scale back the burner temp to medium, and begin your timer. The strain should keep on the PSI or (a bit bit) above at some point of the cooking time.
-
When the time is up, take away the canner from the burner and permit it to take a seat till you hear a particular “click on” of the air vent dropping. Take away the strain regulator and thoroughly take away the lid of the canner (Professional tip: use oven mitts to take the lid off as a result of the steam is tremendous scorching).
-
Let the jars sit for five minutes within the canner after which elevate them out with canning tongs.
-
Place on a thick clear towel undisturbed for 12 hours.
-
After a couple of hours, to test for sealing, gently press down in the course of the lid. If the lid has no give, it’s sealed. For those who can press the lid in and it pops a bit, your jars are usually not sealed.
- Retailer in a cool darkish place for 12-18 months.